It’s quite likely that you’re using Google Workspace (formerly known as Google Suite) at your company. But have you ever wondered about integrating Google Workspace with your Oracle APEX application? Since you’re reading this article, I guess that the answer is “yes”. And I’ve got good news for you: such integration is entirely possible. Let me show you how to do it – step by step.
Update (3rd November 2021) – the article has been updated with an additional section, detailing the setup of the Social Sign-In login method and its integration with Google API.
Many organizations base their functioning on tools from the Google Workspace package, formerly known as Google Suite. The wide range of useful tools encourages utilizing Google Workspace in every area of the company’s operations. So a key question arises – can Oracle APEX be integrated with Google Workspace in my company? As I stated in the intro: yes, of course! Recently, I have faced a challenge of this kind – the project was dedicated to pharmacy and one of the functionalities assumed fetching data from Google Sheet and downloading files from Google Drive.
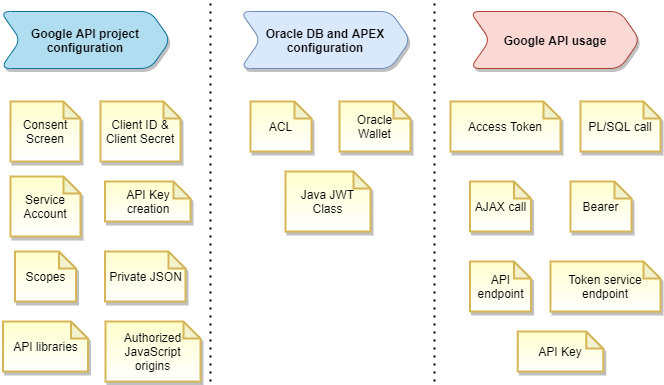
In this extensive step-by-step tutorial, I will show you how to integrate Google Workspace with your Oracle Database and Oracle APEX applications. The tutorial consists of a few parts and – besides the short “What is Google Workspace” intro – all of them are pretty detailed so I advise you to read one at a time.
- What is Google Workspace
- How Google APIs work and how to access them
- Configuring the Google API Console
- Method #1: Integration using Google API Client Library for JavaScript
- Method #2: Integration using Service Account
- APEX Social Sign-In
What is Google Workspace
Google Workspace includes office applications and other productivity tools. It is a set of services provided by Google as a cloud solution. It allows the commercial use of Google applications, such as Google Docs, Google Sheets, Google Drive, etc. After purchasing access to Google Workspace, the company receives a personalized space with its domain and access to services included in the selected subscription. Working with Google Workspace tools can be done on a computer, phone, or tablet.
Google Workspace has become an alternative solution to standard office applications, especially in cases where organizations have decided to stop using office suites installed locally on computers. It is really worth integrating with Google Workspace. Otherwise, the organization exposes itself to low application performance and forces end users to switch between the business application and their resources from Google account. For many companies, Google Workspace has become one of the critical elements of the internal system infrastructure.
How Google APIs work and how to access them
Google Workspace provides an extensive REST API, thanks to which it is possible to use the API methods from the custom application level. For example, the API allows you to add events to Google Calendar, download files from Google Drive or read data saved in Google Sheet. The application we create may look like a Google Workspace tool due to the high level of integration.
Access to Google API is available on two primary levels. The choice of access method depends on the specific API functionality and is defined in the documentation. Both Google API access methods can be configured in the Google API Console.
- If the API call does not refer to the user’s private data, we will use the API Key. This is a string that does not change over time and does not require a periodic update. The API Key is used for the identification in transactions between our application and Google Auth server.
- Otherwise, when we use the API to perform CRUD operations on user’s data, we will use the OAuth 2.0 protocol.
- In this case we use the Access Token to authorize API access, which is valid for one hour. After this time, your application should obtain a new Access Token to communicate with Google API.
- You have to keep in mind that the OAuth 2.0 protocol implemented on the browser level is designed for applications that access APIs only while the user is present at the application.
- The alternative is to use a Service Account and call Google API without confirmation of its identity. This approach will be described in the coming chapters.
What is important, Google API refers to the file’s access rights of the calling user, so if you have access to the file (you are an owner of the file or it is shared with you), then you can access it using Google API. Otherwise, you do not.
When creating an application in Oracle APEX, it would be great to have the native support in integration with the Google ecosystem. Still, it is not fully implemented by the built-in functionalities of the framework. We need to extend the existing mechanisms to make the integration with Google API effective. It can be implemented on two levels – JavaScript and PL/SQL. Each of these levels has its specificity and will be explained in the coming chapters.
Configuring a project in Google API Console
Ok, it’s time to configure a project in Google API Console to use the vast possibilities offered by Google API. One of the necessary elements will be implementing the OAuth 2.0 protocol, through which we can call APIs accessing user’s private data. To implement OAuth 2.0, we will use the ‘Google API Client Library for JavaScript’ provided by Google. https://github.com/google/google-api-javascript-client.
This JavaScript library will be responsible for authenticating the user with his Google account. It will allow you to get the Access Token needed to call the API. You can use this token in calls from JavaScript and PL/SQL. We will also create an API key required for API calls that do not access the user’s private data.
Go to https://console.developers.google.com/start – at this point, you can use the Google account in your organization’s domain to log in.
From the ‘APIs & Services’ menu, select ‘Dashboard’, and then select the available option ‘Create Project’.
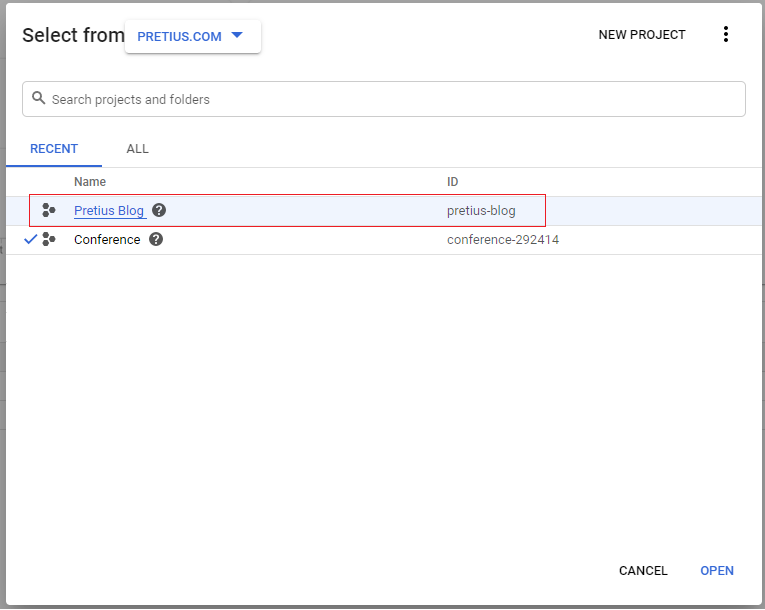
If you already have any other project created in your account, its name will be visible instead.

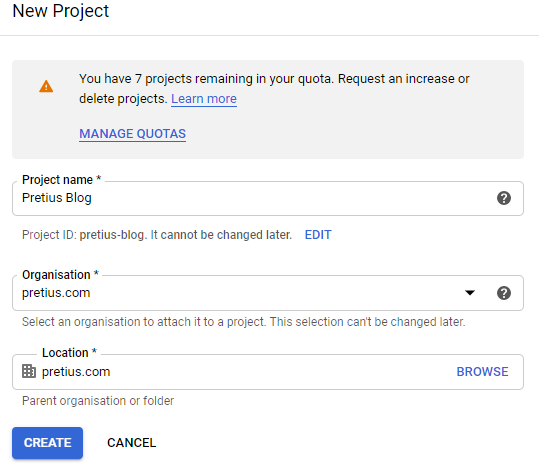
Click on this, and in the pop-up window that opens, select the “New project” option in the top right corner.

On the new project configuration screen, enter its name and click the ‘Create’ button.
After creating the project, you will be automatically redirected to it. However, if this has not happened, select the newly created project from the project selector.
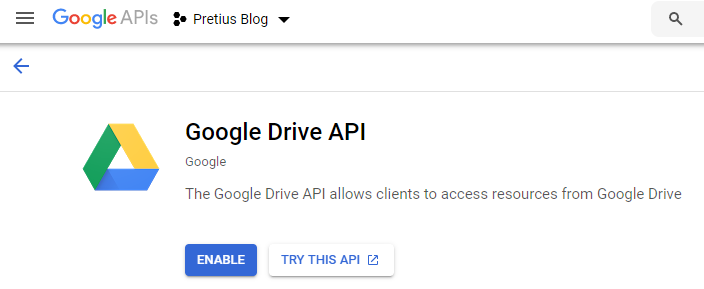
From the menu on the left side, go to the ‘Library’ tab. The entire library of available Google APIs appears. For our example, let’s say that we will need the ‘Google Drive API’ library. Find it and then choose it. On the summary screen, click the ‘Enable’ button.
After activating the API, you will be taken to the ‘Overview’ section, where there is information about it. You will find information about the usage statistics of this API over various periods and links to documentation and tutorials.
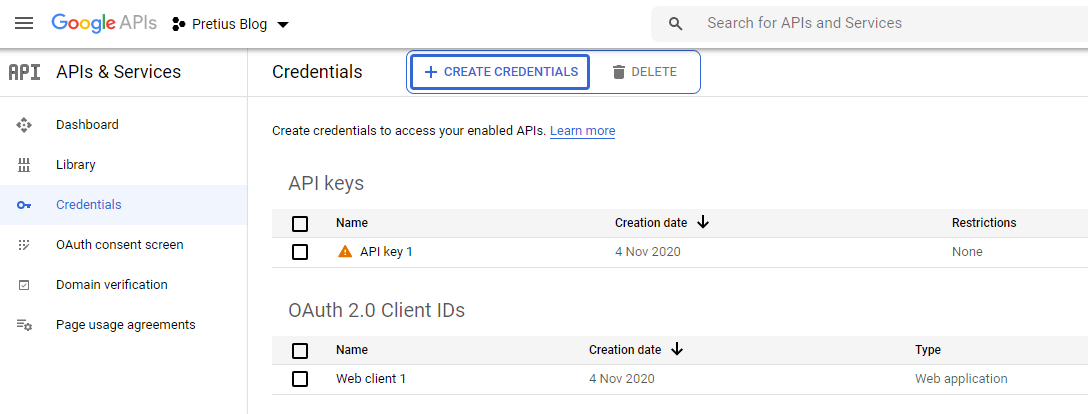
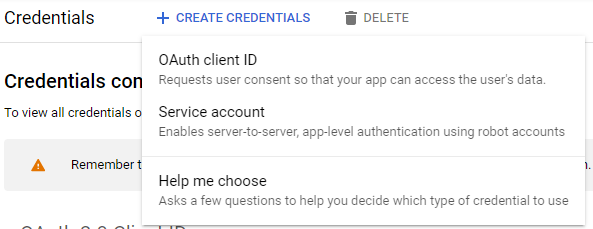
Select the ‘Credentials’ option from the menu available on the left, and then select the ‘+ Create Credentials’ option from the top bar. From the available menu, select the ‘OAuth client ID’ option.
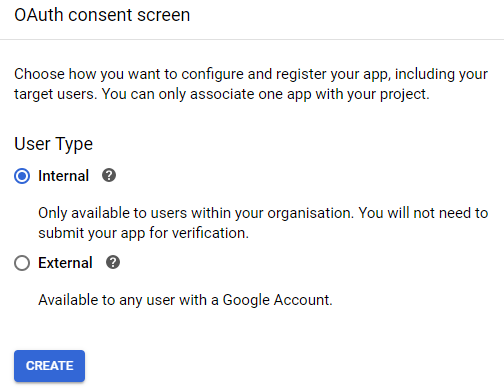
In the first step of the wizard, you will be asked to configure the ‘Consent Screen’. This screen will appear every time you try to authenticate with Google, and it will contain a list of saved Google accounts with the option of selecting one to continue user activities. Select the ‘Configure Consent Screen’ button.
The wizard will ask you to select the type of user. We will focus on the ‘Internal’ type, limiting the possibility of integration to your organization. Click the Create button.
On the ‘OAuth consent screen’, we have several attributes that you can adapt to your application’s needs. The mandatory fields are:
- Application name
- User support email
- Email address in ‘Developer contact information’ section
Additionally, you can pick an image with the application logo or a link to the privacy policy. Click the ‘Save and Continue’ button.
In step 2, “Scopes”, you can select the scope of permissions for user data in Google Workspace that are applicable in your project. Using the “Add or remove scopes” option, select all relevant items from the list and click “Update”. Then click “Save and Continue”. You can learn about the scopes of permissions needed for your integration from the documentation for a specific Google API method.
In step number 3, “Summary”, you can see a summary of our Consent Screen. After verification, click the “Back to Dashboard” button.
Let’s generate all necessary credentials to use Google API. Go to https://console.developers.google.com/start – at this point, you can use the Google account in your organization’s domain to log in. Pick the project that you created previously. Select the ‘Credentials’ option from the menu on the left. Select the ‘+ Create Credentials’ option from the top bar. Select ‘OAuth client ID’ from the available menu.
From the available ‘Application type’ list, select the ‘Web application’ option. Enter the name of your client and go to the ‘Authorized JavaScript origins’ option. In this option, select the main address to your application, in which you will use the integration with Google. In our example, if the APEX application is located in the public apex.oracle.com environment, enter this address – https://apex.oracle.com. For your local environment, enter http://localhost:8080. Click the ‘Create’ button.

Warning! If you decide to add a new environment to the ‘Authorized JavaScript origins’ address list sometime after your OAuth 2.0 client has been created, this environment will likely not be supported correctly by the Google API. It will cause an error visible in the browser console, which means no new environment in the list of authorized JavaScript domains. In this case, create a new OAuth 2.0 client for all environments, including the new one.
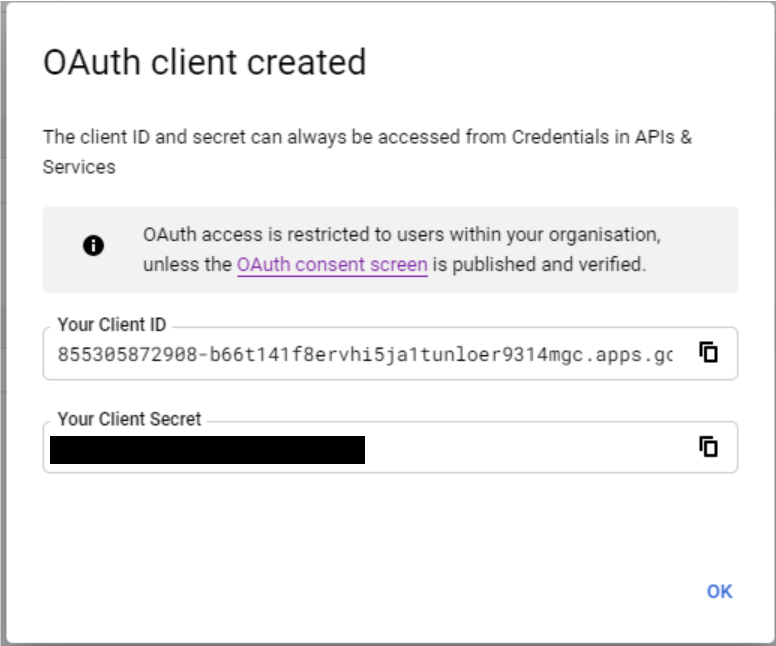
After creating a new OAuth 2.0 client, you will receive information that your client has received two essential elements – ‘Client ID’ and ‘Client Secret’. These two attributes are the login and password equivalents and will be used in the JavaScript library.
The ‘Credentials’ screen shows the created client. We can view its details, rename it, reset ‘Client ID’ and ‘Client Secret’, and add addresses in the ‘Authorized JavaScript origins’ section.
Additionally, for integrations that do not require the OAuth 2.0 protocol, generate an API key. In the Credentials tab, select “+ Create Credentials” and select the API Key option. The key will be generated. You can choose restrictions on API keys’ use due to the allowed application types that can use API Key. You can also select which of the activated Google API libraries in our project will be authorized to use the key. We use the generated key in Google API calls by adding the key=YOUR_API_KEY parameter to the request.
Google Workspace is set up!
We got it! We have finished configuring Google Workspace. The API needed to manage Google Drive is now ready for use in our APEX application. The next step is to prepare the database for communication with Google API and configure the JavaScript library in the APEX application itself.
Important: Besides implementing the OAuth 2.0 protocol based on the JavaScript library, there is also a second method based on a special account called Service Account. This type of account is not associated with any Google Workspace human user in your company. This type of account is useful when you integrate with Google API in systematic processes, e.g., database jobs responsible for data synchronization running at night. In these cases, you can implement the integration without any user action required, as with the Consent Screen. From the Oracle database perspective, the Service Account can be used thanks to the implementation of JSON Web Token (JWT) and the appropriate cryptographic algorithm, which will allow proper communication with the Google token service. This approach will be described later on in this article
Method #1: Integration with Oracle Database and APEX application using Google API Client Library for JavaScript
We can start the configuration of the Oracle Database and APEX application. By this time, we created a Google API project with configured Consent Screen, and Google Drive API enabled. Now, we will add an entry to the ACL access list with the address to Google API. Then we will create an Oracle Wallet, where we will put the certificate responsible for communication with Google API via HTTPS. I will also mention – as a side note – a crucial detail that should be remembered when creating a wallet.
The first step will be to add a new permission to the ACL list, which will associate the database user ‘APEX_200200’ (for APEX 20.2 version) with the address of the Google API service. However, you can type the address of the specific API. The following code creates a separate ACL, but you can use an existing ACL. Pay attention to the address format in the v_acl_host variable – it has no HTTP(s) and www prefixes.
|
1
2
3
4
5
6
7
8
9
10
11
12
13
14
15
16
17
18
19
20
21
22
23
24
25
26
27
|
DECLARE
v_acl_name VARCHAR2(30) := ‘apex_20_2_acl.xml’;
v_acl_desc VARCHAR2(100) := ‘Connection from APEX to Google API’;
v_acl_pric VARCHAR2(30) := ‘APEX_200200’; — change if you installed newer APEX
v_acl_host VARCHAR2(30) := ‘*.googleapis.com’;
v_acl_port_lower NUMBER := null; — change if needed
v_acl_port_upper NUMBER := null; — change if needed
BEGIN
dbms_network_acl_admin.create_acl(acl => v_acl_name,
description => v_acl_desc,
principal => v_acl_pric,
is_grant => true,
privilege => ‘connect’);
dbms_network_acl_admin.add_privilege(acl => v_acl_name,
principal => v_acl_pric,
is_grant => true,
privilege => ‘resolve’);
dbms_network_acl_admin.assign_acl(acl => v_acl_name,
host => v_acl_host,
lower_port => v_acl_port_lower,
upper_port => v_acl_port_upper);
COMMIT;
END;
|
Create an Oracle Wallet or use an existing one to add a certificate responsible for HTTPS communication with Google services. Activate the ‘Auto Login’ feature at the configuration stage. You can download the proper certificate directly from your browser or visit https://pki.goog/repository/.
Warning! After creating the wallet, ensure that the system user ‘oracle’ has access to the wallet files. Otherwise, Google API calls from PL/SQL will raise an exception!
Let’s analyze the google-api-client.js script code. The code was inspired by examples provided in Google documentation and on Google github. This script contains all functions needed for the initialization of the library. Remember that the behavior of your APEX application, as well as the code of the sample script presented in this article, can be freely modified and adapted to the characteristics of your application. The most important function is called ‘updateSigninStatus()‘ and determines how Access Token is handled in your APEX application. You can store the token wherever you want.
|
1
2
3
4
5
6
7
8
9
10
11
12
13
14
15
16
17
18
19
20
21
22
23
24
25
26
27
28
29
30
31
32
33
34
35
36
37
38
39
40
41
42
43
44
45
46
47
48
49
50
51
52
53
54
55
56
57
58
59
60
61
62
63
64
65
66
67
68
69
70
71
72
73
74
75
76
77
78
79
80
|
// Credentials – API keys section
var API_KEY = ‘***’;
// Credentials – OAuth 2.0 Client IDs section
var CLIENT_ID = ‘***’;
// Main menu – Admin – Settings
var APP_ID = ‘***’;
// Scope to use to access user’s G Workspace items (Google Drive example) – space delimited
var SCOPES = “https://www.googleapis.com/auth/drive “ +
“https://www.googleapis.com/auth/drive.file “ +
“https://www.googleapis.com/auth/drive.readonly “ +
“https://www.googleapis.com/auth/drive.metadata.readonly “ +
“https://www.googleapis.com/auth/drive.appdata “ +
“https://www.googleapis.com/auth/drive.metadata “ +
“https://www.googleapis.com/auth/drive.photos.readonly “;
// To store Access Token for Google API
var OAUTHTOKEN;
function showErrorMessage(messageText) {
apex.message.showErrors([{
type: ‘error’,
location: ‘page’,
message: messageText,
unsafe: false
}]);
}
// Load necessary components
function loadGapiLibraries() {
gapi.load(‘client:auth2’, { ‘callback’: initAuth2, ‘onerror’: gapiLoadError });
}
function initAuth2() {
gapi.auth2.init({ ‘client_id’: CLIENT_ID, ‘scope’: SCOPES }).then(authInitialized, authError);
}
function gapiLoadError(error) {
showErrorMessage(‘Error occured while loading library’);
}
function authInitialized() {
authInstance = gapi.auth2.getAuthInstance();
authInstance.isSignedIn.listen(updateSigninStatus);
updateSigninStatus(authInstance.isSignedIn.get());
}
function authError(error) {
console.log(error);
showErrorMessage(‘Error occured while authenticating with Google’);
}
// You can adjust the way how sign in state is handled (if-else code)
function updateSigninStatus(isSignedIn) {
if (isSignedIn) {
var user = authInstance.currentUser.get();
var authResp = user.getAuthResponse();
OAUTHTOKEN = authResp.access_token;
// Add APEX item on Page 0 to store Google API Access Token
apex.item(‘P0_GOOGLE_API_TOKEN’).setValue(OAUTHTOKEN);
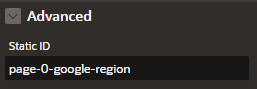
$(‘#page-0-google-region’).hide();
} else {
console.log(‘User is not logged in’);
$(‘#page-0-google-region’).show();
}
}
function signIn() {
authInstance.signIn({ scope: SCOPES }).then(signInCallback, signInCallbackError);
}
function signInCallback() {
// your sign in callback
}
function signInCallbackError(error) {
showErrorMessage(‘Error occured while confirming identity’);
}
|
Modify the google-api-client.js script. Fill in API_KEY, CLIENT_ID, APP_ID, SCOPES constants. These constants’ values can be found in our project in the Google API Console and the Google API documentation.
It is important to mention a fundamental matter – in the implementation presented, the user’s login status in Google is maintained in the application (see documentation). In other words, our APEX application will ask you to log in to Google only the first time you log in, or when this status expires, or when you clear your browser data. In other cases, authentication with Google is invisible to the user, and we have a valid Access Token available.
Side topic: Refreshing Access Token
When communication with Google API is feasible, one important thing stays not addressed – how to refresh the Access Token after 3600 seconds, which is a standard period when it is valid. Let’s analyze this problem and answer how to solve it:
- According to the official documentation of the library, it performs caching and refreshing tokens in the background. If you want to get the current Access Token, just call a library function:
|
1
|
gapi.auth.getToken();
|
- Still, you can adjust how your application will identify logged user and, for example, display the Consent Screen to pick the right Google account again – see the documentation.
- However, if you want to force refreshing the Access Token, it is possible by calling another library function (and then call getToken() function to get the latest Access Token):
|
1
|
gapi.auth2.getAuthInstance().currentUser.get().reloadAuthResponse();
|
- What is more, you can read about ways to refresh the Access Token here https://github.com/google/google-api-javascript-client/blob/master/docs/faq.md.
Let’s create a test application!
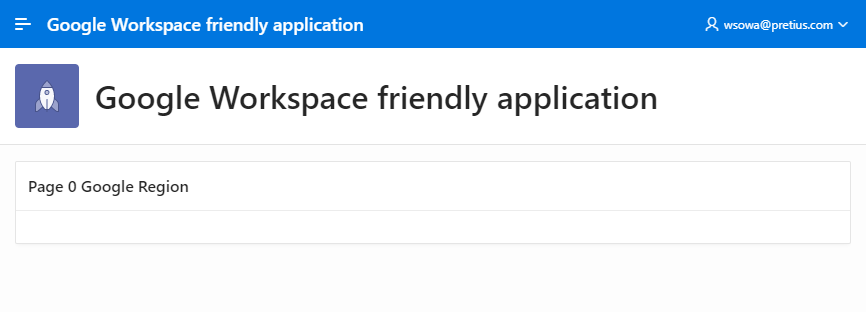
Now it is time to prepare a test application. JavaScript code listed above assumes that on Page 0, we have the region with ‘page-0-google-region’ Static ID.
Upload the modified script in our application as a Static Application File. Copy the reference to the script to the clipboard.
On the APEX application page responsible for integrating with Google API, in the JavaScript -> File URLs section, paste the reference from the previous step, and before it, paste the link to the Google library – https://apis.google.com/js/api.js.

On the APEX page, create a button called ‘Google Sign In’, then add the dynamic action to it of type ‘Execute Javascript Code’ with calling the ‘signIn()’ function. At the page level, in the JavaScript -> ‘Execute when Page Loads’ section, put the call to the ‘loadGapiLibraries()’ function.


At the page level, in the JavaScript -> ‘Execute when Page Loads’ section, put the call to the ‘loadGapiLibraries()’ function.

Create an APEX Item called P0_GOOGLE_API_TOKEN, which will store the current Access Token. It should be of type Hidden with no value protection. Of course, as it was mentioned before, the method of keeping a token is entirely up to you.

Launch the application. You should see the region responsible for connecting to your Google account, in which we placed our button.

After clicking, you should see Consent Screen, where you can select your Google account. Pick the account associated with the domain in which the Google API project was created.

After correct verification, Consent Screen asks us to allow Google API to manage data in our account by the scope of access rights defined in the SCOPES constant.

After accepting, the region should disappear, and in the APEX session, you should have a current Access Token saved, which will be valid for the next hour. Each re-entry of the home page will result in the authentication being performed again, this time invisible to the user – see the documentation.
Having a valid Access Token, you can start integrating our APEX application with the Google API selected in your project in Google API Console. In my case, the Access Token is stored in a JavaScript variable OAUTHTOKEN and an APEX item, so you have to reference it in your code or select another way of keeping the current token in the session. A sample call from PL/SQL looks like this:
|
1
2
3
4
5
6
7
8
9
10
11
12
13
14
15
16
|
— webservice call
declare
l_clob clob;
begin
apex_web_service.g_request_headers.delete;
apex_web_service.g_request_headers(1).name := ‘Authorization’;
— your Access Token in format Bearer/*space*/Access Token
apex_web_service.g_request_headers(1).value := ‘Bearer ***’;
l_clob := apex_web_service.make_rest_request(p_url => ‘https://www.googleapis.com/drive/v3/files/’,
p_http_method => ‘GET’,
p_wallet_path => ‘file:C:\app\pretius\product\18.0.0\admin\wallet’);
dbms_output.put_line(l_clob);
end;
|
And from JavaScript using AJAX:
|
1
2
3
4
5
6
7
8
9
10
11
12
13
14
15
16
17
|
$.ajaxSetup({
beforeSend: function(xhr) {
xhr.setRequestHeader(‘Authorization’, ‘Bearer ‘ + OAUTHTOKEN);
}
});
// for specific fileId
$.ajax({
type: “GET”,
url: “https://www.googleapis.com/drive/v3/files/”,
success: function(response) {
// handle success
},
error: function(error) {
// handle error
}
});
|
All configuration activities are already finished – you can freely use the extensive possibilities of Google API!
Important notice: The Google API Library for JavaScript has got its own components which you can use to communicate with Google API. However, not everything in Google Workspace has got its implementation – hence, our universal solution based on PL/SQL or AJAX. To make use of the components on the library level, you need to load specific Discovery Docs to your client – then, you can use modules like drive, sheets, etc. When working with these modules, it’s good to know some basics of Promise in JavaScript or the async/await approach.
Method #2: Integration with Oracle Database and APEX application using Service Account
Ok, so we’ve successfully integrated APEX with Google Workspace using Google API Client Library for JavaScript. However, we have another integration method to be discussed – an approach based on the “Service Account”, which can be used in processes taking place without the participation of the application user, such as database jobs or processes responsible for importing data.
The first step in our integration will be the configuration of the Google API environment. We will perform the steps of creating a new project and selecting the API libraries needed to complete the sample task. Finally, we will create a technical user who will communicate with the Google API.
Go to https://console.developers.google.com/start – use the Google account in your organization’s domain to log in.
From the ‘APIs & Services’ menu, select ‘Dashboard’, and then select the available option ‘Create Project’.
If you already have any other project created in your account, its name will be visible instead.

Click on this, and in the pop-up window that opens, select the “New project” option in the top right corner.

On the new project configuration screen, enter its name and click the ‘Create’ button.
After creating the project, you will be automatically redirected to it. However, if this has not happened, select the newly created project from the project selector.

From the menu on the left side, go to the ‘Library’ tab. The entire library of available Google APIs appears. For our example, let’s say that we will need the ‘Google Drive API’ library. Find it and then choose it. On the summary screen, click the ‘Enable’ button.
After activating the API, you will be taken to the ‘Overview’ section, where there is information about it. You will find information about the usage statistics over various periods and links to documentation and tutorials.
Select the ‘Credentials’ option from the menu available on the left, and then select the ‘+ Create Credentials’ option from the top bar. Select the ‘Service account’ option from the available menu.
In the first step of the wizard, enter the name of our ‘Service account’ account. The ‘Service account ID’ property is created automatically. The account description is an optional field. Click the ‘Create’ button. Steps 2 and 3 are optional. Click the ‘Done’ button.

You will be redirected to the main page of the ‘Credentials’ section. We can see that a newly created account appeared in the ‘Service Accounts’ section. Select that, and on the next page in the ‘Keys’ section, choose the ‘Create new key’ option in the recommended JSON format. You will be asked to select a place on the disk where our account’s private data will be saved. Click the ‘Save’ button.

|
1
2
3
4
5
6
7
8
9
10
11
12
|
{
“type”: “service_account”,
“project_id”: “pretius-blog”,
“private_key_id”: “***”,
“private_key”: “***”,
“client_email”: “***@***.iam.gserviceaccount.com”,
“client_id”: “***”,
“auth_uri”: “https://accounts.google.com/o/oauth2/auth”,
“token_uri”: “https://oauth2.googleapis.com/token”,
“auth_provider_x509_cert_url”: “https://www.googleapis.com/oauth2/v1/certs”,
“client_x509_cert_url”: “https://www.googleapis.com/robot/v1/metadata/x509/***”
}
|
The extra, optional step is to authorize the created ‘Service Account’ by the Google Workspace administrator in your organization. This part is crucial if you want to use ‘Service Account’ to manage all users’ Google content, particularly the Google Workspace domain. Detailed information on this topic is provided in the official Google documentation. See paragraph ‘Delegating domain-wide authority to the service account’. https://developers.google.com/identity/protocols/oauth2/service-account#creatinganaccount.
The configuration of Google Workspace is done. The API to manage Google Drive is now enabled and ready to use in your APEX application. The next step is to discover this API and implement the access authorization mechanism. Most of the Google API capabilities are accessed via the OAuth 2.0 protocol. https://developers.google.com/identity/protocols/oauth2.
According to Google’s documentation https://developers.google.com/identity/protocols/oauth2#serviceaccount, Service Account can implement the OAuth 2.0 protocol based on available libraries for many programming languages or use the dedicated code responsible for creating JSON Web Tokens objects. In our example, we will use the second approach, where the component responsible for creating the JWT will be a dedicated Java class with an appropriate method.
The created JSON Web Token must be signed with the RSA algorithm using SHA-256 as the hash function. At the time of writing, this is the only signature mechanism supported by Google OAuth 2.0 authorization servers.

The first step will be to add a new permission to the ACL list, which will associate the database user ‘APEX_200200’ (for APEX 20.2 version) with the Google token service address. The code below creates a separate ACL, but you can use an existing ACL as well. Pay attention to the address format in the v_acl_host variable – it does not have the HTTP(s) and www prefixes.
|
1
2
3
4
5
6
7
8
9
10
11
12
13
14
15
16
17
18
19
20
21
22
23
24
25
26
27
|
— ACL – from SYS user – for Service Account
DECLARE
v_acl_name VARCHAR2(30) := ‘apex_20_2_acl_sa.xml’;
v_acl_desc VARCHAR2(100) := ‘Connection from APEX to Google Auth Token Service’;
v_acl_pric VARCHAR2(30) := ‘APEX_200200’; — change if you installed newer APEX
v_acl_host VARCHAR2(30) := ‘oauth2.googleapis.com’;
v_acl_port_lower NUMBER := null; — change if needed
v_acl_port_upper NUMBER := null; — change if needed
BEGIN
dbms_network_acl_admin.create_acl(acl => v_acl_name,
description => v_acl_desc,
principal => v_acl_pric,
is_grant => true,
privilege => ‘connect’);
dbms_network_acl_admin.add_privilege(acl => v_acl_name,
principal => v_acl_pric,
is_grant => true,
privilege => ‘resolve’);
dbms_network_acl_admin.assign_acl(acl => v_acl_name,
host => v_acl_host,
lower_port => v_acl_port_lower,
upper_port => v_acl_port_upper);
COMMIT;
END;
|
In the same way, add a new permission to the ACL list for the Google API service. However, you can type the address of the specific API. Create a new entry in the ACL list or use the existing one.
|
1
2
3
4
5
6
7
8
9
10
11
12
13
14
15
16
17
18
19
20
21
22
23
24
25
26
27
|
DECLARE
v_acl_name VARCHAR2(30) := ‘apex_20_2_acl.xml’;
v_acl_desc VARCHAR2(100) := ‘Connection from APEX to Google API’;
v_acl_pric VARCHAR2(30) := ‘APEX_200200’; — change if you installed newer APEX
v_acl_host VARCHAR2(30) := ‘*.googleapis.com’;
v_acl_port_lower NUMBER := null; — change if needed
v_acl_port_upper NUMBER := null; — change if needed
BEGIN
dbms_network_acl_admin.create_acl(acl => v_acl_name,
description => v_acl_desc,
principal => v_acl_pric,
is_grant => true,
privilege => ‘connect’);
dbms_network_acl_admin.add_privilege(acl => v_acl_name,
principal => v_acl_pric,
is_grant => true,
privilege => ‘resolve’);
dbms_network_acl_admin.assign_acl(acl => v_acl_name,
host => v_acl_host,
lower_port => v_acl_port_lower,
upper_port => v_acl_port_upper);
COMMIT;
END;
|
Create an Oracle Wallet or use an existing one to add a certificate responsible for HTTPS communication with the token service. Activate the ‘Auto Login’ function at the configuration stage.
Warning! After creating the wallet, ensure that the system user ‘oracle’ has access to the wallet files. Otherwise, Google API calls from PL/SQL will raise an exception!
Run the code below to install a dedicated Java class responsible for creating JWT. Remember to change the PRIVATE_KEY value to the value of the private key from the JSON file downloaded at the stage of creating the ‘Service Account’ account.
|
1
2
3
4
5
6
7
8
9
10
11
12
13
14
15
16
17
18
19
20
21
22
23
24
25
26
27
28
29
30
31
32
33
34
35
36
37
38
39
40
41
42
43
44
45
46
47
48
49
50
51
52
53
54
55
56
57
58
59
60
61
62
63
|
// Service Account – Java Class
create or replace and compile java source named “SHA256RSA” as
import java.nio.charset.StandardCharsets;
import java.security.KeyFactory;
import java.security.PrivateKey;
import java.security.Signature;
import java.security.spec.PKCS8EncodedKeySpec;
import java.util.Base64;
public class SHA256RSA {
private final static String PRIVATE_KEY = “—–BEGIN PRIVATE KEY—–n***n—–END PRIVATE KEY—–n”;
private final static String RSA_SHA256 = “SHA256withRSA”;
private final static String KEY_TAG_PATTERN = “—–[A-Z ]+—–“;
private final static String RSA_ALGORITH = “RSA”;
private static String getBase64URLString(String str) {
return Base64.getUrlEncoder().withoutPadding().encodeToString(str.getBytes(StandardCharsets.UTF_8));
}
private static byte[] keyStringToBytes(String keyString) {
keyString = keyString
.replaceAll(KEY_TAG_PATTERN, “”)
.replaceAll(“\s”, “”);
return Base64.getDecoder().decode(keyString);
}
private static PrivateKey getPrivateKey(String privateKeyStr) throws Exception {
byte[] privateKeyBytes = keyStringToBytes(privateKeyStr);
PKCS8EncodedKeySpec keySpec = new PKCS8EncodedKeySpec(privateKeyBytes);
KeyFactory kf = KeyFactory.getInstance(RSA_ALGORITH);
PrivateKey privateKey = kf.generatePrivate(keySpec);
return privateKey;
}
private static String sign(String content, String privateKeyString) throws Exception {
PrivateKey privateKey = getPrivateKey(privateKeyString);
Signature signer = Signature.getInstance(RSA_SHA256);
signer.initSign(privateKey);
signer.update(content.getBytes(“UTF-8”));
byte[] signatureBytes = signer.sign();
String signature = Base64.getUrlEncoder().encodeToString(signatureBytes);
return signature;
}
public static String signContent(String header, String claim) throws Exception {
String jwtContent = getBase64URLString(header) + “.” + getBase64URLString(claim);
return jwtContent + “.” + sign(jwtContent, PRIVATE_KEY);
}
}
|
Install the ‘google_auth_pkg’ package. There is a function ‘f_get_google_token()’, which will return a token for communication with Google API using all the mechanisms described in the previous steps. The token is valid for 60 minutes from the moment when it is generated.
|
1
2
3
4
5
6
7
8
9
10
11
12
13
14
15
16
17
18
19
20
21
22
23
24
25
26
27
28
29
30
31
32
33
34
35
36
37
38
39
40
41
42
43
44
45
46
47
48
49
50
51
52
53
54
55
56
|
create or replace package google_auth_pkg as
function f_get_google_token(pi_iss in varchar2,
pi_scope in varchar2) return varchar2;
end google_auth_pkg;
/
create or replace package body google_auth_pkg as
function f_get_jwt_signed(pi_header in varchar2,
pi_claim in varchar2) return varchar2 as
language java name ‘SHA256RSA.signContent(java.lang.String, java.lang.String) return java.lang.String’;
function f_get_google_token(pi_iss in varchar2,
pi_scope in varchar2) return varchar2 as
l_header varchar2(4000);
l_claim varchar2(4000);
l_jwt varchar2(4000);
l_token_url varchar2(4000);
l_token_clob clob;
l_return_token varchar2(4000);
begin
l_header := ‘{“alg”:”RS256″, “typ”:”JWT”}’;
l_claim := ‘{‘||
‘”iss”:”‘|| pi_iss || ‘”,’||
‘”scope”:”‘ || pi_scope ||‘”,’ ||
‘”aud”:”https://oauth2.googleapis.com/token”,’||
‘”exp”:’||to_char(round((CAST(sys_extract_utc(SYSTIMESTAMP) AS DATE) – to_date(‘1970-01-01 00:00:00’, ‘yyyy-mm-dd hh24:mi:ss’))*24*60*60) + 3600)||‘,’||
‘”iat”:’||to_char(round((CAST(sys_extract_utc(SYSTIMESTAMP) AS DATE) – to_date(‘1970-01-01 00:00:00’, ‘yyyy-mm-dd hh24:mi:ss’))*24*60*60)) ||
‘}’;
l_jwt := f_get_jwt_signed(pi_header => l_header,
pi_claim => l_claim);
l_token_url := ‘https://oauth2.googleapis.com/token?grant_type=urn%3Aietf%3Aparams%3Aoauth%3Agrant-type%3Ajwt-bearer’ || chr(38)|| ‘assertion=’ || l_jwt;
apex_web_service.g_request_headers.delete;
apex_web_service.g_request_headers(1).name := ‘Content-Length’;
apex_web_service.g_request_headers(1).value := 0;
l_token_clob := apex_web_service.make_rest_request(p_url => l_token_url,
p_http_method => ‘POST’,
p_wallet_path => ‘file:C:\app\pretius\product\18.0.0\admin\wallet);
apex_json.parse(l_token_clob);
l_return_token := apex_json.get_varchar2(p_path => ‘token_type’) || ‘ ‘ || apex_json.get_varchar2(p_path => ‘access_token’);
return l_return_token;
exception
when others then
raise;
end f_get_google_token;
|
Briefly about the input parameters of the ‘f_get_google_token’ function. The value for the ‘pi_iss’ parameter must be the value of the ‘client_email’ attribute from the JSON file downloaded at the stage of creating the ‘Service Account’ account.
The ‘pi_scope’ parameter is responsible for determining the range of permissions to use the API. Google API has an extensive list of scope for enabled API libraries. Thanks to this, it is possible to indicate permitted actions on the API. Subsequent scopes are separated from each other with a single space.
|
1
2
3
4
5
6
7
8
9
10
11
12
13
14
15
16
17
18
19
20
21
22
|
declare
v_access_token varchar2(4000);
v_file_id varchar2(4000) := ‘your_file_id’;
v_clob clob;
begin
v_access_token := google_auth_pkg.f_get_google_token(pi_iss => ‘pretius-blog@pretius-blog.iam.gserviceaccount.com’,
pi_scope => ‘https://www.googleapis.com/auth/drive.readonly https://www.googleapis.com/auth/spreadsheets.readonly’);
dbms_output.put_line(v_access_token);
apex_web_service.g_request_headers.delete;
apex_web_service.g_request_headers(1).name := ‘Authorization’;
apex_web_service.g_request_headers(1).value := v_access_token;
v_clob := apex_web_service.make_rest_request(p_url => ‘https://www.googleapis.com/drive/v3/files/’ ||
v_file_id,
p_http_method => ‘GET’,
p_wallet_path => ‘file:C:\app\pretius\product\18.0.0\admin\wallet’);
dbms_output.put_line(v_clob);
end;
|
What’s more, the use of the scopes provided in this parameter must be on the list of authorized scopes set by the Google Workspace administrator in your organization. Otherwise, access to the unauthorized API will not be possible, which is another aspect of API access control.
Values for the ‘pi_iss’ and ‘pi_scope’ parameters can be stored as package constants or in the table with your application’s properties.
Almost done! As the Service account is not associated with any personal Google account, you still need to share your Google Drive content with this special account. Otherwise, you will get a response ‘404 Not Found’. When sharing, enter the ‘client_email’ from the JSON file describing the Service account’s private data.
Now we are ready to use Google API in combination with the APEX application and Service Account. The only thing you have to remember is requesting a new access token after the current token expires.
APEX Social Sign-In and Integration with Google API
Oracle APEX allows you to implement a login mechanism into your application in many ways, including the very popular option to log in through a Facebook or Google account.
Also, in this case, we can integrate with Google using available mechanisms offered by Social-Login. We will need OAuth 2.0 client data, that is Client ID and Client Secret. We can use the client created earlier, see paragraph 3 of this post.
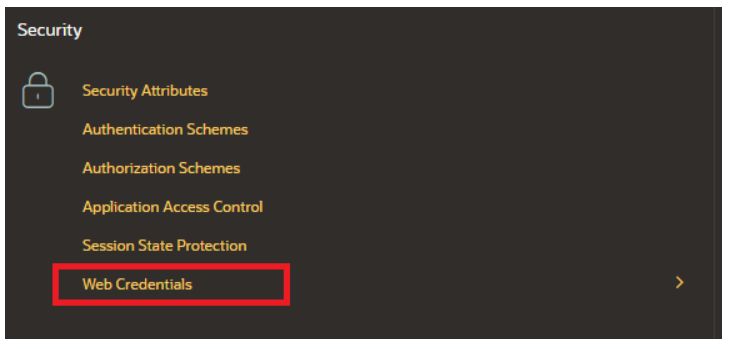
Next, we go to the Shared Components section of our application. In the Security section, we select Web Credentials.
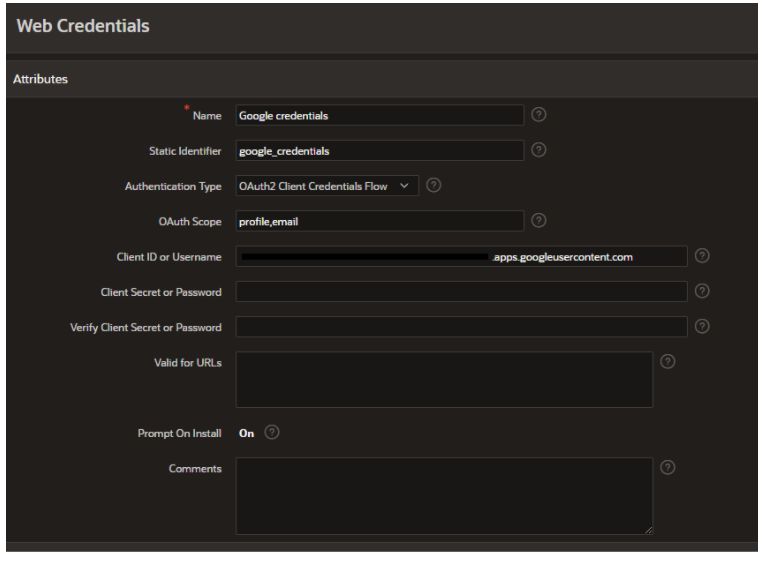
Here we create a new configuration. It is important to fill in the Static Identifier field, which we will use in one of the next steps. We choose OAuth2 Client Credentials Flow as the Authentication Type, and we also fill in the Client ID and Client Secret.
Next, we proceed to create a new Authentication Scheme. We indicate Social Sing-In as the Scheme Type, and in the Scope section, we specify the Google API access scopes of our choice. Remember to only indicate necessary and sufficient API Scopes to make your application more secure. In the Credential Store field select the access credentials created in the previous step.

Now, all that remains is to make sure that the Authentication Scheme created is the valid login method for the application. We can proceed to testing.
If our APEX application has a login based on the Social Sign-In method, we will not see the classic application log-in screen. In the case of login based on a Google Account, you will see the consent screen mentioned in this article.
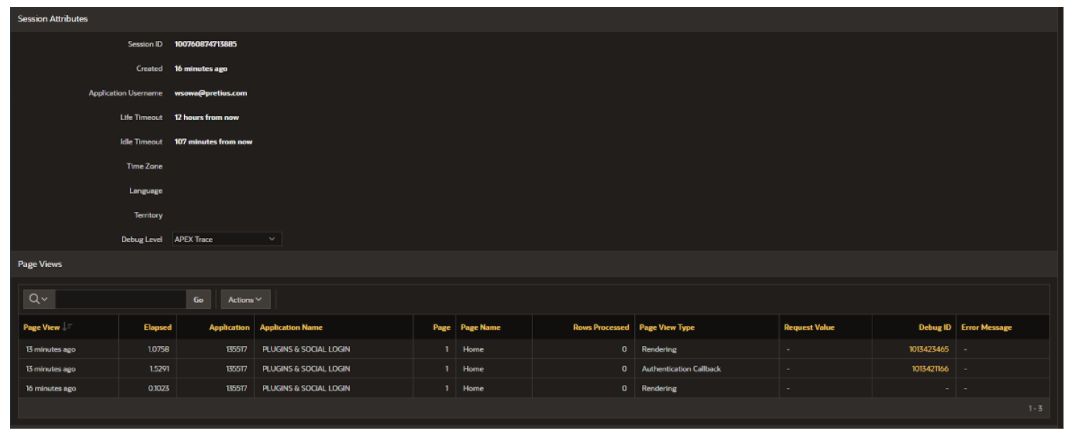
If we take a look at what is happening in the APEX session, we can see how the corresponding JSON Web Token is created, and then, in response, we receive an Access Token. It’s a good idea to start a brand new APEX session for this purpose, and in the Monitor Sessions section, select the APEX Trace setting for the Debug Level option. After logging into the application, refresh the Page Views report. You will then see a new row described as Authentication Callback. Under the indicated Debug ID we will find all the necessary information.
It’s time to put our Social Sign-In into practical use. It’ll communicate with the Google API and work closely with it. We’re creating a new PL/SQL process on our chosen site.
declare
  l_clob clob;
begin
  apex_web_service.g_request_headers.delete;

  l_clob := apex_web_service.make_rest_request(
    p_url => 'https://www.googleapis.com/drive/v3/files',
    p_http_method => 'GET',
    p_token_url => 'https://oauth2.googleapis.com/token',
    p_credential_static_id => 'google_credentials'
  );

  :P1_RESULT := l_clob;

exception
  when others then
    :P1_RESULT := sqlerrm || chr(13) || chr(10) ||
                  dbms_utility.format_error_backtrace || chr(13) || chr(10) ||
                  dbms_utility.format_error_stack;
end;
Here we can see a reference to a token service that will be used to authorize access to the indicated Google API method. Second, we add the identifier Web Credentials, which we created in the first step of setting up the Social Sign-In. This way we get a response from the web service, this time in the form of a JSON.
If we look at our APEX session once again, we can see that APEX uses the available access tokens, which it stores in a so-called credential store. The taken token is then verified for its validity. The last step is the Google API call itself, and APEX adds the necessary Authorization request header by itself. This shows that, while programming the application, the APEX developer doesn’t get direct access to the full contents of the Access Token.
This step closes the entire article in which I described how to configure both Google and Oracle environments. Now the sky is the limit, so don’t wait any longer and create your own Google Workspace-friendly application!